Categories
Feeding Tube

What Should Be In My Emergency G Tube Kit?

Disclaimer: The post is based purely off of experience, please see my Disclaimer page to read more.

If you or your child has a G tube, then you probably have an emergency G tube kit, and if you don’t – then you should!

Why?

G tubes are life savers, and I don’t just speak metaphorically, for some people, they are the only way to get nutrition and hydration into the body. I speak more about this in my blog post comparing the NG tube with the G Tube.

But of course, the G tube doesn’t come without it’s potential complications, and when said complications arise, you’re not always going to be in the comfort of your well stocked home.

That’s where an emergency G tube kit comes in.

In this post I’m more specifically referring to the button g tube, as this is what I have experience with – some of these comments may not apply to other types, but I am not an expert so I can only speak from experience.

Lets talk about these potential complications.

I’m not going to go too much into detail about all of the risks that come with the g tube because 1. I’m not a medical professional and 2. I only really want to focus on the ‘more likely’ things that may happen.

So what could happen?

The G tube could fall out – and by fall out I’m also referring to being pulled out or the balloon could burst, thus leading to the tube falling out. The stoma has a very fast healing time, so sometimes waiting until you get home just isn’t an option unless you’re willing to go through another gastrostomy surgery.

Blockages – Especially if your tubie is on a thicker feed, powder mix feed or a blended diet. Sometimes those blockages can’t be solved with warm water or syringe tricks.

It’s not safe to use – There could be a reason why you feel the g tube just may not be safe to use, maybe its leaking, it looks strange or there’s just something else going on that leads you to be uncomfortable using it. Especially if the gastrostomy is new and still healing.

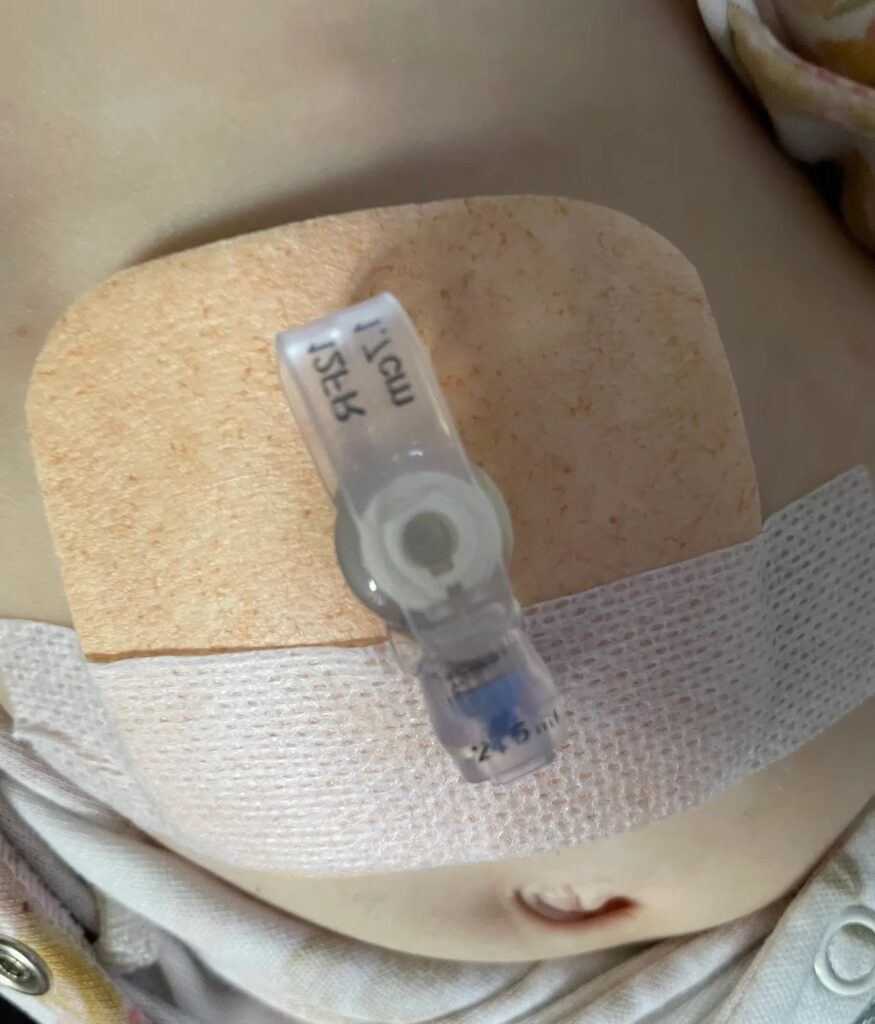
You’ve forgotten the extension – If you have, have had or have experience with a button g tube, you will know you need to attach an extension set to it for feeds. It’s very easy to forget a small plastic tube among your feeding supplies – believe me I know! The extension could also be damaged in some way and therefore not usable.

There could be other reasons that I’ve missed on this list, but this is all I can think of!

How To Make An Emergency G Tube Kit

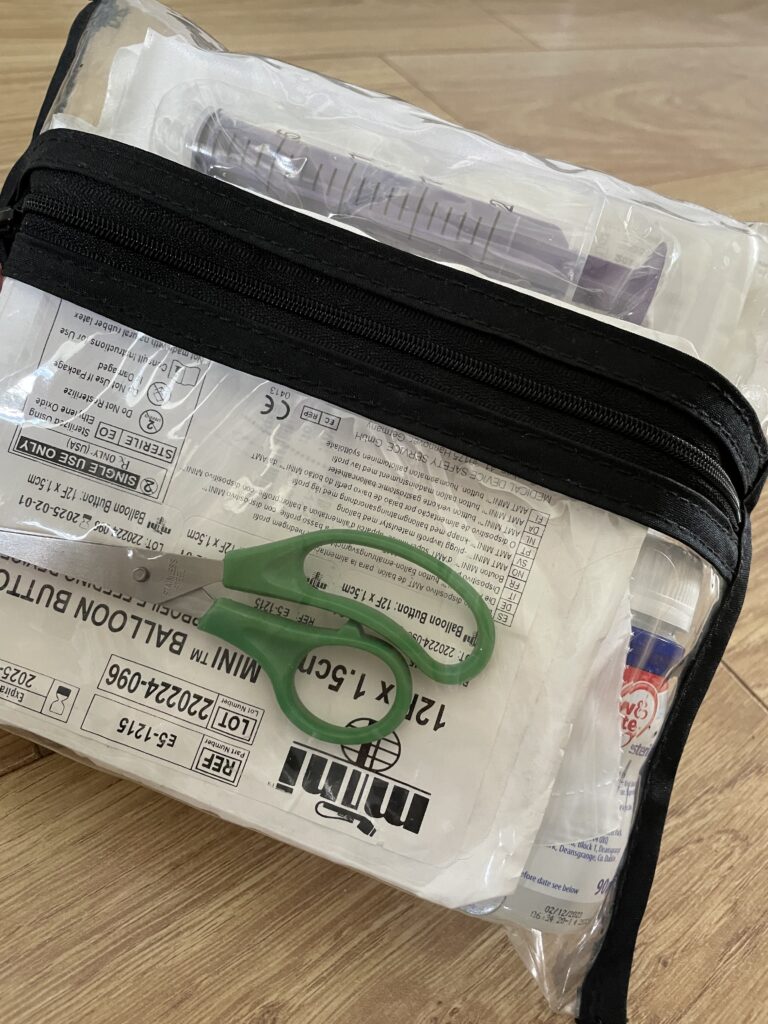
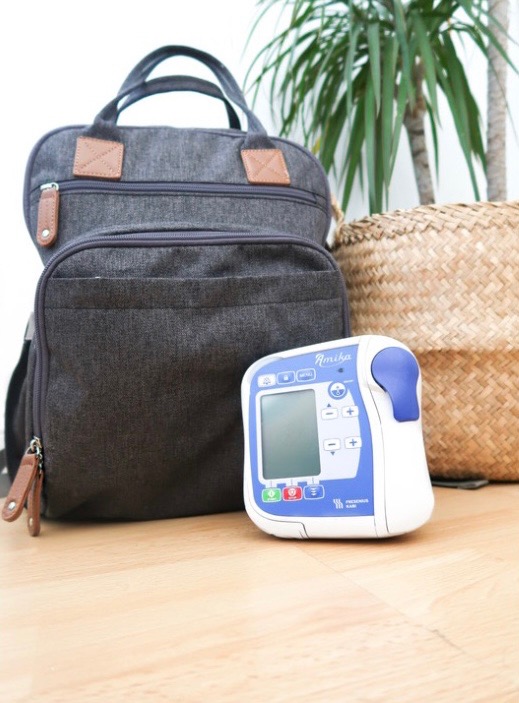
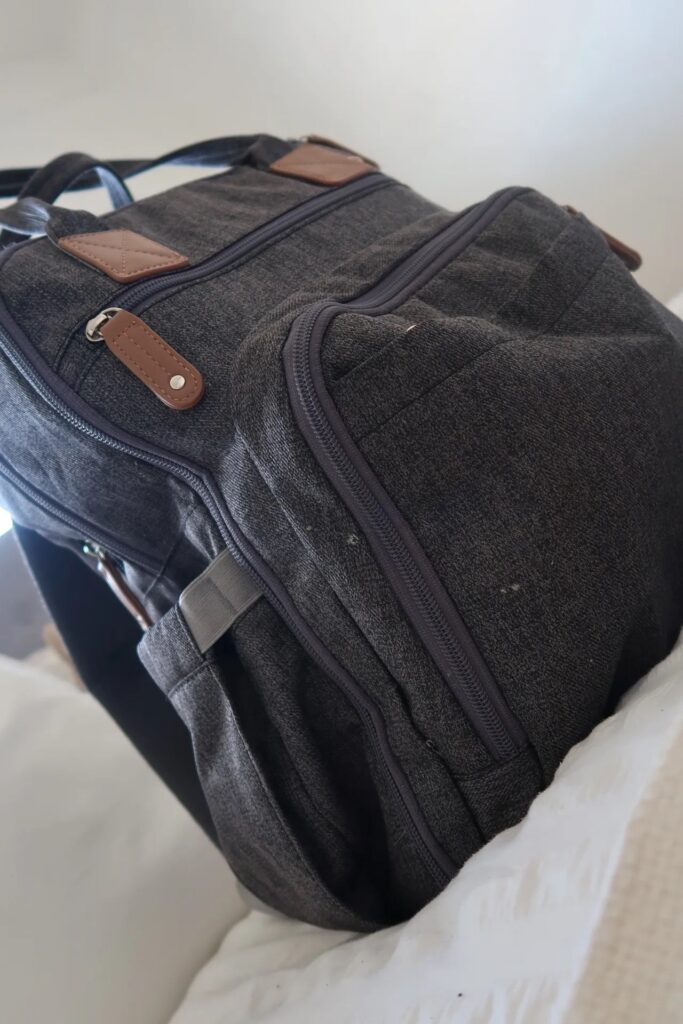
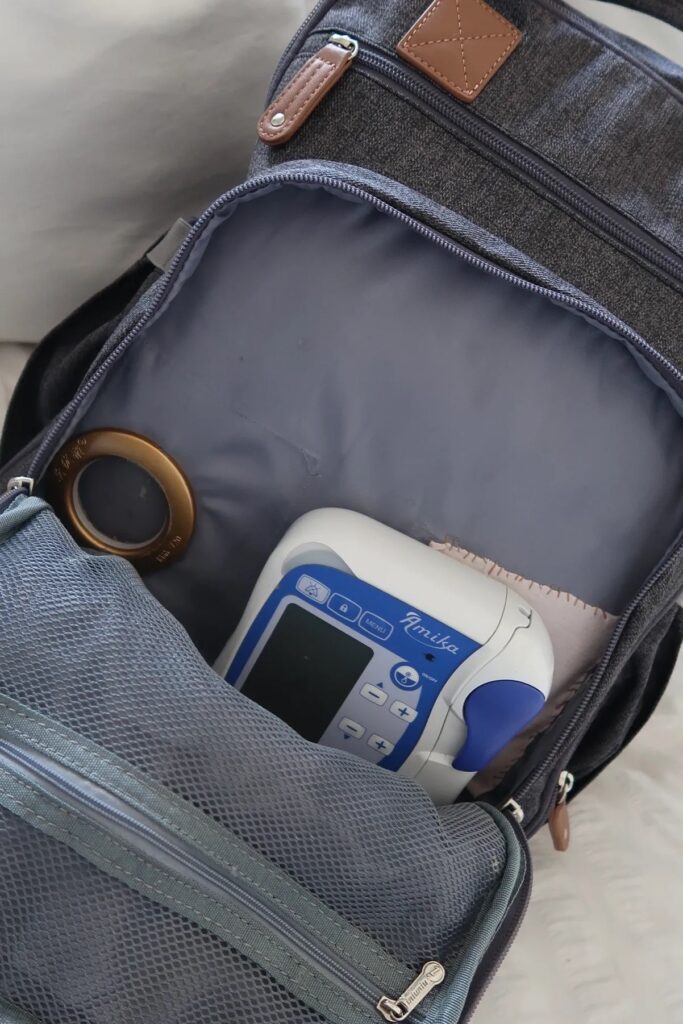
Start with a bag or pouch of some sort, to keep all of your supplies together – I like to use a clear pouch so I can see everything that’s in it.

This pouch should go wherever you or your tubie go. I keep my daughter’s in her baby changing bag, as a general rule of thumb, the changing bag goes wherever we go, so does the kit!

What I Keep In My Daughter’s Emergency G Tube Kit

When thinking about what to put in my daughter’s emergency g tube kit, I found it easier breaking things down into sub-categories. That way I wouldn’t forget anything.

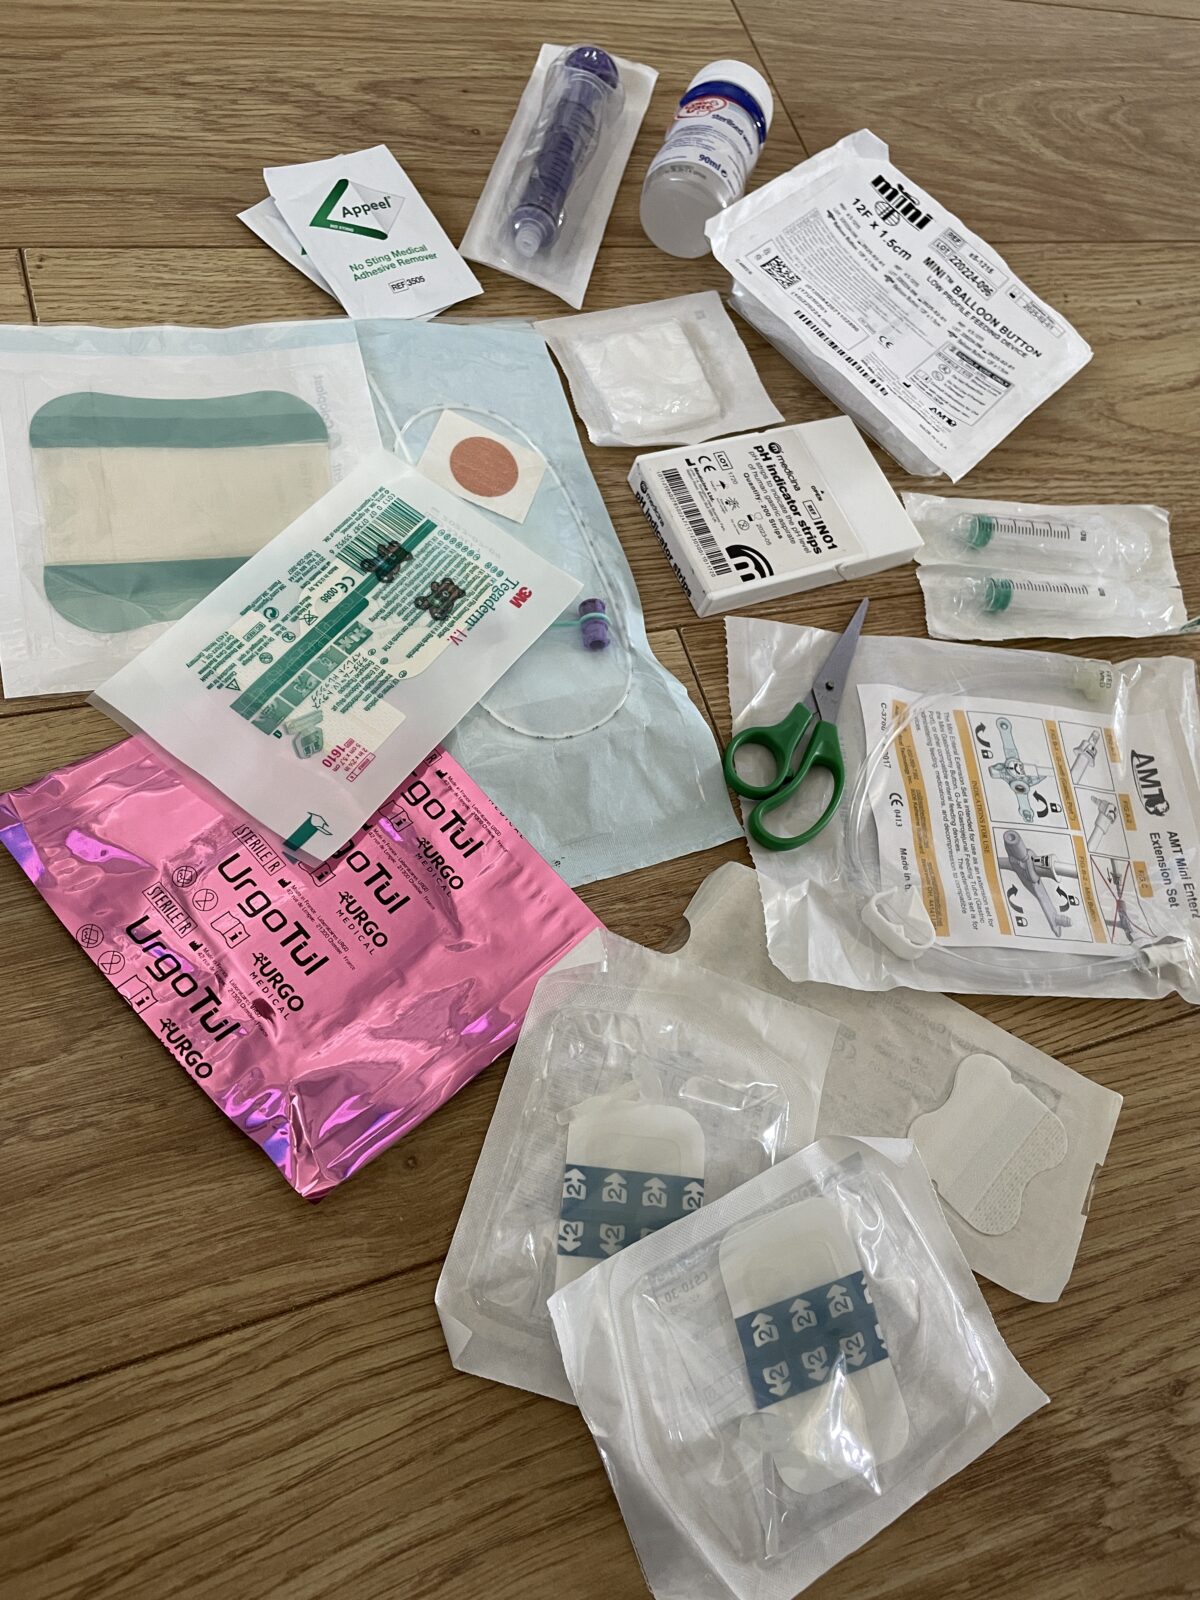
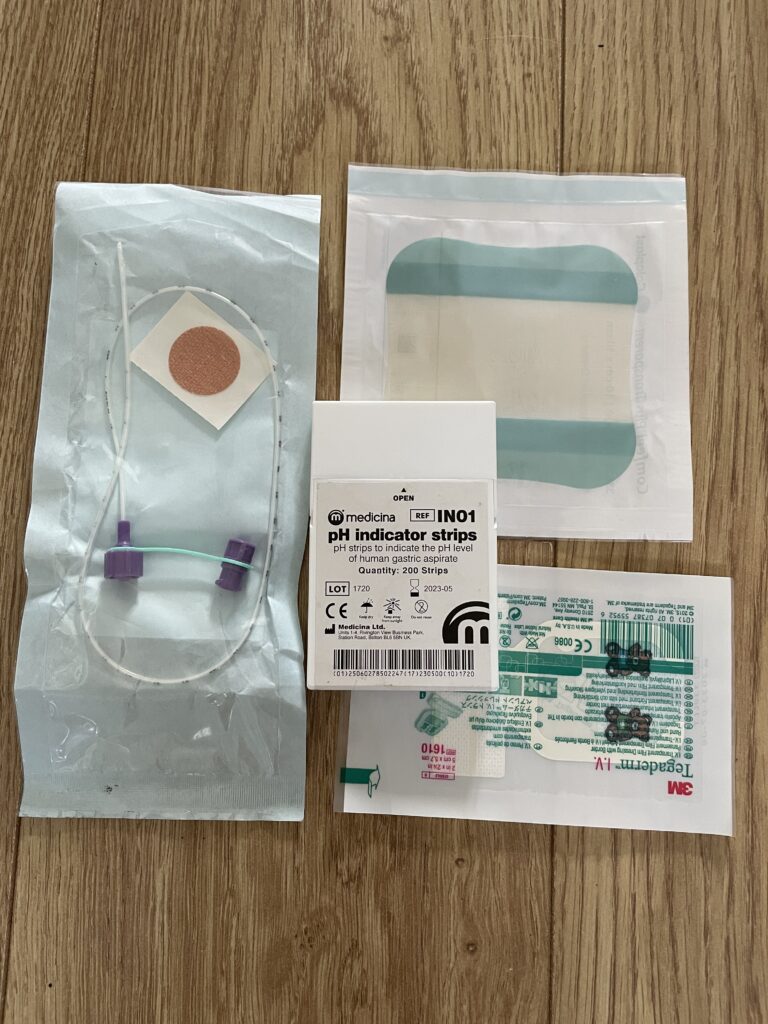
Button Change Supplies

Sterile water, spare balloon, syringe, luer tip syringes, pH strips

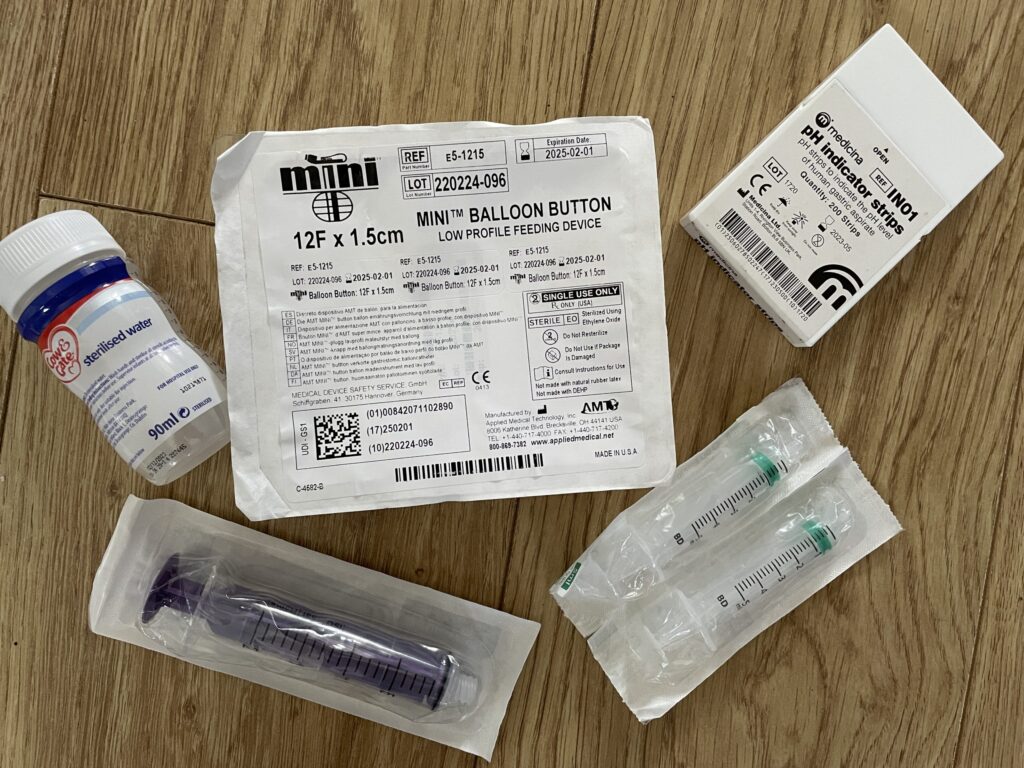
A spare button – this is self-explanatory

Sterile water – This is vital for balloon button g tubes, but it also comes in handy for other things which I will get to. You can purchase small sealed bottles of sterile water that last a while, Cow & Gate is the brand we and our hospital use. You could also make your own with boiled, cooled water, but this is only good for 24 hours, so you would need to keep replacing it.

Luer tip syringes – or whatever type of syringe your button uses to deflate and inflate the balloon.

pH strips – you need these to confirm the placement of your g tube.

A spare syringe – just in case you didn’t plan on using your g tube on your outing, you may not have a syringe on hand, but again, you will need this to confirm the placement of your g tube. I recommend keeping a 20ml or 60ml syringe in your emergency g tube kit. I have been told by medical professionals that any smaller can put pressure on the balloon if you aspirate with them.

A spare extension set – just incase!

NG Tube Supplies

pH strips, Tegaderm, Comfeel & an NG tube

This for me is a last resort option, but I’d rather be prepared for all eventualities than caught off guard.

Imagine a situation where the g tube comes out without being noticed, like I said, the stoma has a fast healing time. There could be a scenario where stoma stoppers and spare g tubes are no use. In which case you need another method to feed or hydrate your tubie.

So I like to keep a back up of NG supplies just in case. Call it a plan B. Fortunately I am trained to pass my daughter’s NG tube, so this isn’t an issue for me. But even if you’re not, it’s still handy to keep NG tube supplies in your emergency g tube kit.

NG Tube – whatever length and French size is suitable.

Comfeel and Tegaderm – To secure the tube to the skin. Comfeel or another barrier isn’t 100% necessary in an emergency, but it doesn’t take up much space.

You would also need pH strips and a syringe – but I already covered these items.

Cleaning supplies

Gauze and sterile water

I think its handy to keep something in your kit to clean the stoma if necessary, you already have sterile water, so all you really need is some gauze – again, it doesn’t take up much space, and you never know when you might need to clean the stoma site.

Miscellaneous

Just a few extra bits – again I like to be prepared for all eventualities.

Tape to secure the g tube – If you’re in a scenario where you cant wash your extension set between uses, it may be easier to leave it attached to the button. This can be uncomfortable if it pulls, so I like to tape my daughter’s extension down if I’m leaving it attached.

Absorbent pads – this one wont be necessary for all – my daughter suffers from persistent granulation tissue and our community nurse advised us to us it. So of course, we keep a fresh one in our emergency g tube kit.

Medical scissors – generally a handy tool to keep in your kit. Especially if you need to cut tapes.

Stoma Stoppers

Stoma stoppers

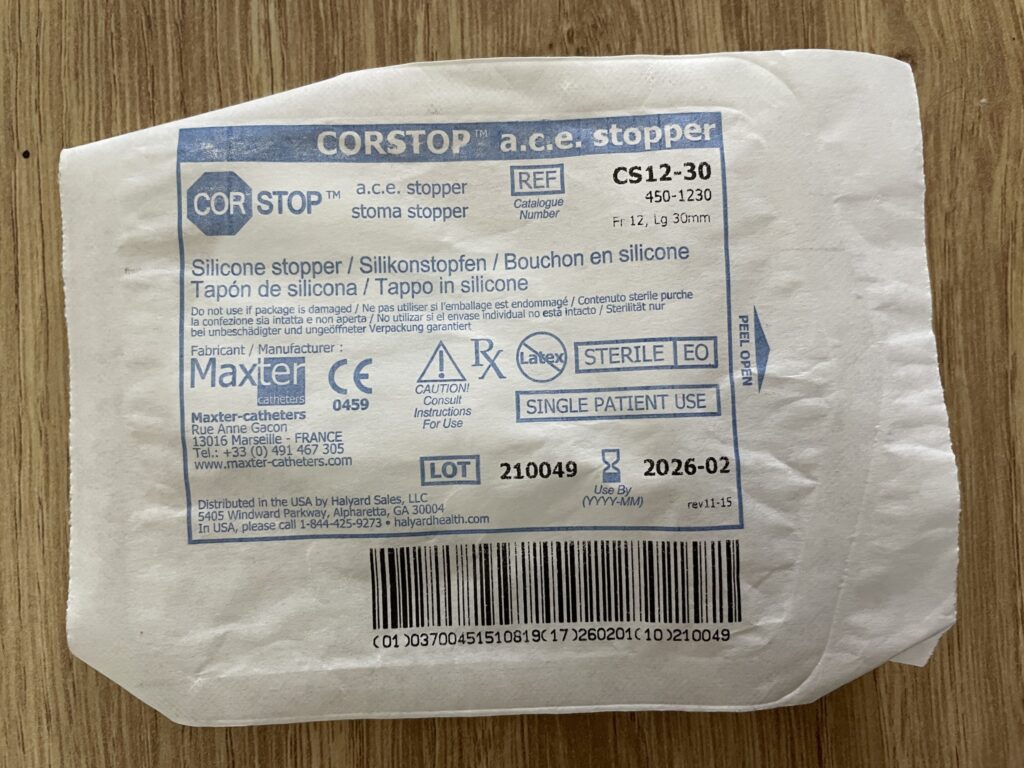
These are what they say on the tin – they stop the stoma from healing when it’s not being occupied in an emergency. I’ve not had to use one in action yet, but it’s a very good thing to keep on hand. I recommend keeping two sizes, one the size of the g tube, and one size smaller (just in case the stoma has managed to shrink, and you can’t fit your usual size). In my daughter’s kit, I keep a 12 fr and a 10 fr. Stoma stoppers are handy if the g tube has made it’s way out of the stoma, but you are not in the predicament to change it straight away – the point is to keep the stoma open.

That’s everything we keep in our emergency g tube kit. It has already come in handy a couple of times, usually just because we’ve forgotten an extension set.

But I can feel confident knowing when I’m out and about with my daughter that I don’t need to worry about a tube miss hap, the emergency kit will cover me for a lot of bases.

Just don’t forget to replace the items that you use.

I hope you found this blog post helpful, don’t forget to follow along on our journey making memories and creating an amazing life, while adapting to additional and complex medical needs.

Categories
Special Needs Family Life

How I Knew My Child Had Autism

My son, Zachary was diagnosed with Autism when he was four years old. 

In his first few years, there were definitely signs, but it wasn’t until he started preschool that it really became a question – Is my child ‘different’?

In this video I talk all about those little signs and gut feelings I had when Zachary was a baby. I was a young Mum, only nineteen when he was born, I’d never had any experience with child development (other than the brief year I studied in high school), I thought he was just a bit behind, but nothing I should be concerned about.

In this video I talk about those little signs and gut feelings I had when Zachary was a baby. As well as the journey to his diagnosis, his other medical conditions and how he’s doing now.

Categories
Special Needs Family Life

Disneyland With Disabled Children

Some of the links in this blog may be affiliate links. Please rest assured I will only link to products I would actually recommend to you.

We recently returned from a short trip to one of the most magical place on Earth – Disneyland Paris. 

We travelled as a whole family of six – myself, my husband and our four children, three of them you will be familiar with, Zachary who is 9, Eli who is six and Avery who is 17 months, my step son Marley, who is 10 also accompanied us so we could experience the magic as an entire family.

If you’re not new to my blogs, Instagram or Youtube channel then you will know that two of my children have additional needs, Zachary has Autism and Avery has a range of complex medical needs, including Cerebral Palsy, Dystona and she is 100% g tube fed. 

Anyone of you that has travelled with children will know that it is no small feat, you almost need a holiday to recover from the holiday, but… when some of those children have additional and complex medical needs, the process can be a whole lot more challenging. 

I did a lot in the lead up to our trip to make sure we were covered for every eventuality – after all it’s not uncommon for Avery to need an impromptu hospital visit every now and then. So I wanted to make sure we were fully prepared for all scenarios. 

The Logistics

Our trip was booked on a ‘budget’ – I use this term loosely because, well Disney is far from cheap! But we opted for a lot of the less expensive options. 

We chose to travel from Gatwick Airport as they had the cheapest flights to Charles De Gaulle (CDG) Airport, which meant we already had a long stretch of travel before we even made it to the plane, the drive from home was around five hours! We flew with Easy Jet – again because they offered the cheapest flights.

We stayed at B&B Hotel which is a Disney partner hotel, this seemed like the smartest option as they offered a free shuttle to and from the Disneyland Parks. We would have loved to stay on site – but that just wasn’t in our budget. We booked directly through the Disneyland Paris website, it was a hotel and ticket package. We found that outsourcing our travel was the much cheaper option.

For transfers to and from our hotel we went with the Magical Shuttle, at the time it seemed like the most affordable and convenient way to travel as a family of six – but I’ll get to more about that in a minute. 

The Preparations

I did a ton of research when we booked our trip, what to take, what to do, what to prepare for our special needs children, if you’re thinking of travelling to Disneyland and you or your children have additional needs, hopefully the next few paragraphs will save you some time.

Airport Assistance

The first thing I did was arrange special assistance with the airline we were flying with, which was Easy Jet. This was a pretty simple process, you just have to select the option in your account, the rest is done at the Airport itself.

Insurance 

Next was travel insurance, this was a big one (obviously), everyone needs travel insurance, but we found that your standard, commercial companies wouldn’t insure Zach or Avery. The two companies we did find with decent policies and were specialised in the medical side were goodtogoinsurance.com and staysure.co.uk.

For this trip we went with goodtogo.

Now I wont lie, the insurance ate a fair chunk of our budget, but you can never be too careful, right?

To go alongside our insurance, I also ordered a UK Global Health Insurance Card for each member of our family. This card lets you get state healthcare in Europe at a reduced cost or sometimes even free. Needless to say, we needed neither the insurance or the card, but I felt much more at ease knowing we were covered.

Medical Documents

One of my biggest fears was that we would get turned away from either security or customs at the airport – Avery had a lot of specialised feed and medicines, one of which contained a controlled substance. I wanted to take proof on top of proof that it would be a catastrophe if that happened (and it would be!).

I made sure I had printed up to date prescriptions for every one of Avery’s medicines. Alongside that I also had her Paediatrician write a letter confirming Avery did indeed need her medicines, feed and equipment. Did we end up needing this? No. Am I still glad we took the? For my sanity, absolutely.

Storing The Feed

Avery’s particular feed needs to be refrigerated between uses, and since we were facing 29 degree days I knew a cooler bag just wasn’t going to cut it. We ended up taking twelve bottles of Avery’s Compleat Paediatric – one for every feed while we were away from home. This was an absolute, last case scenario – I didn’t love the idea of wastage, one bottle would usually cover three feeds. But… in the worst case then at least Avery had enough of her feed.

I contacted Disneyland Paris directly, and they kindly responded fairly quickly, letting me know they had a first aid centre in each park, where I could store Avery’s medicine. Now the feed, I will say was a grey area, they don’t normally allow you to store food or baby milk there, but if I had proof that Avery’s feed was a specialised G tube feed then it would be a problem. So I added another piece of paper to our folder – a letter from Avery’s dietician confirming that was the case. 

Our hotel also agreed to storing her feed in their fridges while we were there – although I don’t think this would have been the case had it not been a g tube feed. 

Priority Access Cards 

This is Disneyland Paris’ Disability scheme as it were – they have two types of access cards, Easy Access Cards and Priority Access cards, in our case the priority cards were what we applied for as we would benefit the most from them.

Now Disneyland Paris is strict compared to Disneyworld’s DAS system (or so I’ve heard). At Disneyland Paris you actually need to prove you, or your child has the difficulties you’re claiming. This needs to be some form of documentation, there’s a list of acceptable forms of proof on their website. 

I was able to pre-register for Zachary and Avery’s access cards thirty days before our trip on the Disneyland website (I will leave a link below). I just needed to answer a few questions, fill out a few details and provide a picture of each of them. I was then presented with a code which I needed to take to City Hall on our first park day, along with our documents.    

I believe if you are staying on site you can also collect your access cards directly from your hotel. 

Side note – B&B Hotel do not have kettles in the rooms. This is a non-negotiable for us as we still use sterile water for Avery’s flushes. So we purchased a very inexpensive travel kettle from eBay.  

That was all the research and planning sorted, the next hurdle was packing. That’s a whole other story so I won’t go into that. But if you are interested in seeing that process I have a pack with me video on my Youtube channel. 

So let’s get into our actual experience…

Travel Day 

Travelling to the airport was a dream (apart from the lack of sleep, and by lack of I mean none). We left home at 11:30pm and made the five-hour drive to the airport. Avery slept the entire way and the boys seemed comfortable despite the fact that our seven seat Nissan was full to the brim. 

We arrived at the airport at around 5am and headed straight for the special assistance desk. They presented Zachary with a sunflower lanyard and helped us drop off our one suitcase (this in itself made special assistance worth it as we skipped the very long que). 

We then proceeded through a separate security which was much quieter, and we felt a lot less pressure when it took us forever to offload all of our liquids and medicines into their plastic boxes. 

A couple of us needed to be patted down (including Avery), but it was no big deal. No one questioned Avery’s feed or medicine and we didn’t need to show them any documentation.

We settled into a quiet area just on the edge of the hustle and bustle of the main departure lounge until our flight – which was all very straightforward.

Like I said earlier, we booked the Magical Shuttle for our transfers to and from our hotel. What we didn’t know that we wish we did – CDG is a very large airport, and we had a lot of walking to do to get to the shuttle terminal. 

By this point we had already missed the shuttle by about ten minutes, so we had almost an hour to wait in the heat before the next one was due to leave. It was very hot in Paris, we were already tired and sweaty – so this wait wasn’t welcome, but it was no one’s fault. 

Zachary was given a sunflower lanyard to symbolise hidden disabilities

The Hotel 

We arrived at our hotel at around 2pm, we checked in, collected our park tickets directly from the hotel and got our room code. She also gave us vouchers for free parking at Disneyland, we did not drive but that’s something to note if you do choose to travel that way.

The room was basic, very basic, but comfortable, and everything we needed (although a mini fridge and kettle would have been appreciated, but budget hunters can’t always be choosers!). The room had a double bed, a bunk bed, a twin bed and a travel cot already set up for Avery. There was a small bathroom off to the side with a bath and shower head. The power outlets were limited in my opinion for the amount of people in our family, but then again, we did have extra medical equipment and a kettle – so that could just be me being picky!

If you’re there to enjoy the parks and not the hotel, I would definitely say it’s a nice budget friendly option. The rooms were clean, a continental breakfast was included, and they had an arcade and a room with vending machines and a microwave. They also had a snack bar with pretty nice food, but this doesn’t open until the evening. 

Avery met Olaf!

Disneyland Paris

We took the free shuttle to the parks; the timings were a bit hit and miss during the afternoon but in the morning, they seemed to run every ten minutes or so. We were grateful to find they had spaces to park strollers, so we didn’t need to fold it down.

We finally made it to Disneyland at 3pm, and of course, we were all completely awe struck by the theming, the music and the smells (yes the smells!). 

Something to note – there is security at Disneyland, and every bag needs to go through their machine, we had a lot of bags clipped onto Avery’s stroller, so this was a bit of a faff. 

We went to the main park first and headed straight to City Hall for Zachary and Avery’s Access Cards. There was a bit of a que, it probably took about 20 minutes to get through it, but once we were in the staff were friendly and the process was straightforward. I showed our reference numbers and documents; in our case it was the kids’ DLA letters. Zachary was awarded with a green card and Avery with a purple card, which meant we could class her pushchair as a wheelchair and take it through the lines with us. 

I won’t drone on about how amazing Disneyland is and all of the things we did, I have a vlog coming on my Youtube channel that you can check out if you’re interested in what we got up to – but I do just want to mention a few key things that we experienced as I think it would be useful.

1. Not every ride is suitable for littles even if it doesn’t have a height restriction, especially if they don’t have much head control. We took Avery on the Pirates of the Caribbean ride without realising there are a few steeper drops, luckily Avery seemed more than happy – my husband and I just needed to clutch on to her so her head wouldn’t get knocked around. 

2. The crowds are insane! Especially if you are going at a peak season, the days we were there the parks were at full capacity. There are lots of people walking in different ways at different paces, and no one really looks where they’re going, so be prepared for that. 

3. Paris’ summer is very hot – this is subjective, I’m from the UK so were not used to very hot weather, pack your sun cream, pack a portable fan, pack flannels to cool off – especially for babies. And stay hydrated!

This portable fan was a life saver for us, it kept Avery’s stroller much cooler

4. Take full advantage of your Access Cards, they’re not just for the ride lines, you also get access to a special area for the illuminations (right in front of the castle) and the parades and there’s a separate line for security and entry into the parks. Use it all – it makes the world of difference, trust me!

5. Don’t be afraid to ask – if you’re unsure of something, the cast members always seemed happy enough to answer our questions and guide us in the right way. 

Our view of the castle from the priority access area

Going Home 

We were sad to say goodbye, we wished we could have gone for longer, especially after the experience. We tried to cram so much in just one full day and two half days that we ended up burning ourselves out very quickly. 

If you are able to, I’d recommend at least three or four nights, to allow yourself the time to take a break and reset. If we ever get the opportunity to go again, we will 100% do this. 

The special assistance at CDG was equally as impressive as Gatwick, if not more. We were basically escorted all the way up to the gate. I was so impressed with the way both airports catered to disabilities. 

I hope some of this helps you prepare if you are planning a trip to Disneyland, or any trip for that matter a lot of the thing we did we would apply to other trips we may take in the future. 

Ultimately, as exhausted as we were, I’m so grateful we got to experience Disneyland Paris as an entire family. I found Disney to be incredibly inclusive, and each member of our family got to have a magical time. 

Watch our DIsneyland Experience

Useful Links

Apply for a UK Global Health Insurance Card – https://www.gov.uk/global-health-insurance-card

Disneyland Paris’ accessibility services –  https://www.disneylandparis.com/en-gb/guest-services/accessibility-at-disneylandparis/

Categories
Special Needs Family Life

My Daughter’s Brain Injury

If you’re familiar with my website, my Youtube channel, or my brand in general, then you probably already know that my daughter, Avery has complex medical needs. 

Avery’s story is both a sad and a happy one. The strength and resilience of this tiny human still blows my mind. She is both unlucky and lucky, a tragedy and a miracle – and over the last year I’ve really been trying to keep my thoughts positive and focus on the latter of those statements. 

I’m going to add a TRIGGER WARNING here, because although I am focusing on just how incredible my daughter is, her story may be upsetting to some. So read on at your own discretion – if you are easily triggered by trauma, particularly involving an infant, perhaps one of my other blogs would be a better read. 

You’ve probably heard about babies born with oxygen deprivation, whether that be an already present condition, a labour complication or a premature birth – but this didn’t happen to Avery.

So how did Avery end up with a brain injury? You may ask.

Just minutes old

Avery was born healthy, after a very straightforward 6-hour labour and two pushes, she was in the world, beautifully pink, crying, with not one concern.

We spent three exhausting, incredible days as a completed little family in perfect, oblivious, bliss. 

I’m going to skip a little here, purely because my heart and mind are just not ready to relive how it all happened yet – but long story short, Avery survived a 40+ minute cardiac arrest.

That’s incredible right? I still can’t comprehend it, 40 minutes?! How is that even possible? Well it is, my amazing, strong three-day old baby girl did it.

What amount of damage can 40 minutes do?

It didn’t take a Doctor to tell me that Avery would have suffered some severe oxygen deprivation. After all, 40 minutes is a very long time – did I mention that my daughter is incredible?

A few days after Avery’s event, she had an MRI, which revealed that Avery had a severe brain injury. Her damage was mostly in the areas of her Cerebellum and Hippocampus. Was I shocked? No. Did that mean the news didn’t completely devastate me? Absolutely not. Was I still incredibly grateful that she was here and fighting? Heck, yes!

The day Avery graduated from PICU, also the day the bow became her trademark

How did this damage present in Avery?

We are still very early on in our journey, Avery is only now about to turn 17 months old, so we still have a lot to learn about Avery’s brain injury and how it will affect her in the future. 

The Cerebellum is responsible for motor skills, coordination, balance, posture… so in my non expertise, it pretty much sounds like that’s the majority of physical development, right?

When thinking of the hippocampus, my brain went back to what I had learnt from my Mum – she has a lot of knowledge about Alzheimer’s and Dementia from her job, so I immediately assumed Avery’s memory would be affected. 

Physically, it doesn’t take close observation to see that Avery’s diagnoses line up with her development – it’s slow, inchstones, not milestones.

I’ll be honest, I have absolutely no idea if Avery’s memory is affected. I’d like to think it isn’t. She remembers people, TV programmes, routines – I can tell that by the beaming smile she graces our presence with when she’s anticipating her favourite things. 

The Secondary Diagnoses

Avery’s primary diagnosis is Hypoxic Ischemic Encephalopathy (more commonly known as HIE) – for us non Doctor’s, it basically means a brain disorder caused by a lack of oxygen and blood flow. 

Most of her other conditions are all secondary to her HIE. She has Cerebral Palsy, what type I am still unsure of, I can only assume her neurologist wants to give her more time before we can be certain – what we do know is that she has spasticity (I hate that word but it is the correct medical term) in her arms. That means that her muscle tone is too high, causing her arms to be very stiff and tight. Her trunk and neck however, are the opposite. 

She was also diagnosed with Dystonia when she was six months old. Dystonia is a medical term for a range of movement disorders. Avery’s Dystonia causes her to have uncontrollable spasms.

She also has severe reflux, now this one we can’t be 100% certain that it was a direct result of her brain injury – she could have had it anyway. 

Avery is also g tube fed – this isn’t a condition as such – but is still a direct result of her brain injury. Motor function and coordination are all needed to eat and drink as well. I had no idea that so much went into it – which kept me incredibly deflated all the times I tried to get Avery back on the breast – turns out it’s a lot of hard work! 

Needless to say,

Avery is my daughter, not her disabilities.

It took me a really long time to really comprehend this point, guilt is a really tough pill to swallow. Avery has really helped guide me along the way – as she gets older, her character shows through, and man, doesn’t she have character!

Yes, she is disabled, there are things that she may never be able to do. 

Will she walk? We don’t know. 

Will she talk? We don’t know.

Will she ever be able to eat? Again, we don’t know.

The unknown is the single most hardest thing about this situation, but I found that when I stopped wondering what she will and won’t accomplish, and started solely enjoying her for who she is now, everything just felt so much more promising, and I found acceptance.

Avery will decide what she will do when she is ready, in the meantime, it’s my job as her Mummy to just love her and enjoy her for all of the incredible things about her right now.

Avery is an incredible, strong, happy little girl

And what can she do?

She can smile, she has the most beautiful smile that radiates joy to those around her. 

She can play, with a little help from us she’s found things that she finds enjoyment in. 

She can progress and develop, and she is (inchstones, remember!) Everyday, little by little, she is building strength and balance and coordination.

She can give and receive love – I don’t need her to be able to talk to know this without a doubt. 

She can experience the world around her, there’s absolutely no reason why she should ever miss out. We’re in a day and age now where disabilities are recognised, accepted and catered for. 

I could go on about all of the wonderful things about Avery and her special life, but I’m sure you get the point.

Avery’s brain injury does not define who she is, those sweet, amazing little things we discover about her each day are the things that matter. 

She is my superhero, the strongest, bravest little girl I will ever know.

Categories
Feeding Tube

DIY Feeding Tube Bag

Some links in this post may be affiliate links. There is no additional charge to you. Rest assured I would only link to items I would recommend to you.

So you or someone you know has a feeding tube. Maybe you’re tired of carrying around multiple bags. Or you don’t love the mobile feeding bag you were provided with. Or maybe you just want to be a little more discreet or even a little more stylish without your feeding bag cramping your aesthetic.

I’m going to talk you through exactly how I adapted my daughter’s regular baby changing bag, into a convenient and multi-purpose feeding bag. 

I’m going to throw in an extra little disclaimer here, I am not a medical professional, dietician or a professional seamstress for that matter – so I’m bringing you my tips purely from experience. 

Back Story

My 16-month-old daughter, Avery has been tube fed almost her entire life, and when she got her feeding pump the company also provided us with a backpack for mobile feeding, which sounds great right? No.

As grateful as I am for all of the equipment that is provided to Avery, I quickly realised it was a real pain in the back side having to lug around a bulky feeding bag, alongside her usual baby changing bag, and her syringes, spare feed, clothes, nappies… the list goes on. If you’re a Mom, you’ll know exactly where I’m coming from. 

Not only that, the bag was *cough* ugly. It certainly didn’t compare to the on trend grey baby changing bag I had purchased before Avery was born.

Unfortunately the exact bag I purchased is no longer available but this one is pretty darn close! In honour of transparency, this is an affiliate link, so if you happen to love this bag as much as I did and purchase it, I will receive a small commission, there is no additional cost to you 🙂 – https://amzn.to/3yW5K5z

My beloved baby bag

Why So Expensive?

So, I took to all of the marketplace, eBay, Amazon, Etsy… and there was my solution, what looked like an ordinary bag, adapted for all those tubies out there – but they came at a price. I think the cheapest I found was £60 and they ranged all the way up to the low hundreds.

I pride myself on being somewhat of a budget queen. I love a bargain, and it takes me a long time to talk myself into spending a lot on something, especially when there was nothing too complicated about the item.

I have been incredibly unimpressed at the price tag on some things special needs related, what a sick way to corner a market that could already do with a break, I could go on about that for hours but, that’s not what you’re here for.

I decided – it couldn’t really be that difficult to make this bag myself, especially after watching a few YouTube videos, it seemed like a pretty simple process. 

Making The Thing

Now, I am a creative person, but sewing is not my strongest point, so there were mistakes made along the way, and I had to patch things up in a not so pretty manner. But on the outside of this bag, you’d never know!

The best part is these adaptations could be made to pretty much any bag, but I would suggest using a bag that has a separate pocket at the front that fits your feeding pump, this way you can access it easily without having to rummage through the main pocket. 

I wanted to make this project as cheap as possible, just in case it didn’t work out. So I just used the baby bag I already had. I liked the look of it, I loved the organisational pockets, and I already had it, so there was money saved. 

I bought a 10 pack of curtain grommets from eBay, and they were relatively inexpensive. I already had needles and thread at home and Carabiner Clip, so with less than £10 spent, I got to work.

I ended up having to remove a couple of my beloved organisational pockets to make it work, but there’s still plenty left to sooth the inner OCD in me. 

As you can see, I am clearly not a seamstress, and I got a little scissor happy – hence the patchwork. With that said, if I can do it, so can you!

My first mistake was not checking where I wanted to lines to run, so I ended up making a hole where I didn’t want it (and then doing a very messy patch up job to cover it). Luckily I only needed to create line access on the inside of my bag asI have a double zip system that works great to feed the end of tube out of the bag, but if you need to make an exit hole out of your bag, this is definitely something to consider! The grommets are also a tad fiddly so that took me a little while to figure out.

But I did it, with minimal skill set, 20 minutes max, and hardly any money. And here’s how:

What you’ll need:

· A bag or backpack

· A grommet

· A needle and thread

· A Carabiner Clip

· A strong piece of fabric or ribbon (I just used a cut off from an old bag strap)

Method:

1. Sew your ribbon into the lining of the bag in a loop, if your bag has that thick edging that’s the perfect place for it. The placement is personal preference, I was able to utilise one of the many pockets in my bag. Make sure you sew over it a few times as this will need to be nice and secure.

2. Hook your Carabiner Clip into this loop – This will clip onto your feed, water or whatever you use your feeding pump for.

3. Create your holes for your grommets  – make sure you measure your hole against your grommet size, too small and the grommet wont clip, too big and you’ll need to buy bigger grommets! Consider if you will need a hole from one pocket to another on the inside of your bag, or if you’ll need an exit hole.

4. Clip your grommets onto the holes you’ve cut. (You can also try to attach your grommet before you cut your holes but then you’ll be left with excess fabric and may not look as clean).

That’s pretty much it! Now feed your giving set through your bag, attach your feed to your Carabiner Clip, set it all up and give it a test run. 

I have a video all about how were adapting to cater to the needs of my tubie baby, featuring this little DIY hack! I don’t regret hacking at this bag at all because I love the end result and it’s made life with a tube fed child so much easy. 

I would suggest having a practice run on a bag you don’t care about so much, that choice is totally yours. 

If you do follow this guide to create your own DIY feeding tube bag then please tag me in a picture over on Instagram and let me know how it’s worked for you, I would love to see your creations!

Categories
Feeding Tube

NG Tube or G Tube: Which Is Right For My Child?

There are SO many reasons why a child or baby might need a helping hand with getting nutrition into their body. Brain injuries, premature birth, gastrointestinal issues….

The list goes on!

I am NOT a medical professional so I can only speak from my personal experience. My daughter, Avery suffered a hypoxic event at 3 days old, as a result she has Cerebral Palsy among other conditions. 

Her coordination took a massive hit, which includes the huge amount of skill it actually takes to eat, as much as we can take it for granted!

Which leads me to the topic of this blog.

If you’re more of a watcher and less of a reader, I have a YouTube video that covers all of the points in this blog and more.

What Do I Know?

If you’re reading this blog I imagine you’ve already got some idea of what an NG and a G Tube are. 

Avery has been tube fed almost her entire life, apart from the small stretch of time before her event when we were blissfully oblivious to what we would soon have to face. 

She had an NG tube from the PICU days up until April 2022 when she had her gastrostomy surgery for her new Mini Balloon Button to be placed.

Just before Avery’s gastrostomy surgery

What’s The Difference?

The name suggests (Naso-gastric), the NG tube is inserted through the nose and makes its way down to the stomach. The G Tube button is inserted directly through the surface of the abdomen into the stomach and is held in by a little water filled balloon.

There are other types of G Tube – But once again, I am not a medical professional, so I can only speak from experience, so I’ll be referring to the Mini Button.

Pros & Cons

They both have them.. and I could go on for hours about the challenges we’ve dealt with while adjusting to the tubes. But I’m sure you don’t want to see paragraph on paragraph of me droning on about all of our encounters – so I’ll try and keep it simple.

NG Tube

Temporary – The NG tube is usually what’s recommended when it’s only a temporary situation. It can be inserted and removed at home by whoever is trained to do it.

‘Simple’ Procedure – I say this subjectively because it’s not a pleasant experience to pass a new tube, but by simple, I mean it doesn’t take surgery. 

The risk – On its merry little way to the stomach the NG Tube passes a couple of very important organs – the lungs. The tube could potentially move to the lungs – you can imagine worst case scenario, but aside from that, it can cause chest infections. A chest infection in an already vulnerable child can lead to much nastier things.

PH Testing – Yes this is the only thing we had to prevent the previous risk, but it’s a tedious task. Especially since Avery was taking Omeprazole which made those little strips very difficult to read.

Reflux – We were told countless times by a certain medical professional that the NG tube shouldn’t affect reflux, but after doing our own research, low and behold – it does!

Discomfort – I don’t think this point needs much explaining, there’s a tube in the throat.

Appearance – Superficial I know, but obviously, the tube is inserted through the nose, which means it needs to be taped to the face. I can’t speak for Avery’s opinion but if it was me, I would most definitely feel self-conscious.

G Tube 

We use absorbent dressings to help control the granulation tissue

Low Profile – A G Tube can be easily hidden with clothing – The Mini Button in particular is very discreet is it’s just a small button on the surface of the skin. An extension set is then attached to the button for feeding.

Blended Diet – I’m only touching on this briefly as we’re not quite at this stage yet, but we will be! G Tubes are bigger in diameter since they don’t need to go down the nose. So there are more feed options, including real blended foods (Very much looking forward to this).

Surgery – Since this tube is inserted through the skin there is surgery involved. Definitely not a nice experience as a parent or for Avery – or so I assume since she was in too much pain to be held for 2 whole days.

Infection – This risk comes with any surgery. We’ve been battling infection ever since the surgery. I don’t want to scare you hear – Avery’s Tube is too big in length which is basically what caused the infection, and since we can’t change the tube until the 3 month recovery mark – antibiotics and dressings it is!

Fast Healing Time – This seems as though it should be a pro right? No, the stoma heals super fast, so if you have a curious child that manages to pull out their tube and you don’t notice in time – you’re basically back where you started.

What’s right for my child?

I can’t answer that for you, but I hope this post has helped you gain a bit of knowledge from a Mother’s perspective. 

For our family and Avery, I still think we’ve made the right choice – infections and all! 

It’s so nice to be able to see Avery’s hold face without tapes taking up the majority of her cheek, and she no longer screams when she gets put down on the floor in anticipation of the dreaded NG Tube change. 

The option of a blended diet was one of the biggest advantages for me, the idea that she can still be consuming real foods made at home. I’ll be sure to leave an update on how that goes when her stoma is fully healed. 

I hope you decide what’s best for your child and your family. But just remember when making your decision – fed is best, no matter the method!